
How To: Business Central Edit in Excel & Open in Excel
- Michael Intravartolo

- Nov 8, 2022
- 2 min read

Let’s say you want to update your customer list in Microsoft Dynamics 365 Business Central to ensure that email information is entered and correct for billing purposes.
Or, maybe you want to retarget current customers with your latest marketing content. Whatever the case may be, updating information quickly within Business Central is a simple process. Best of all, by using the Edit in Excel and Open in Excel features it’s just as easy to make changes to your changes if needed.
Business Central Edit in Excel vs Open in Excel
Business Central’s Edit in Excel and Open in Excel features can be found on most pages that display records in rows and columns. Also, both features allow you to export these records to Excel by clicking the share icon at the top of the page. So, what’s the difference?
Edit in Excel
The Business Central Edit in Excel feature exports your information into Excel where you can edit your information and then publish your data back into Business Central from Excel. You do not have to enter your changes manually into Business Central.
Open in Excel
The Business Central Open in Excel feature exports your information into Excel where you can make changes but you cannot publish these changes back into Business Central. You can only save these changes in Excel. If you want to reflect these changes within your Business Central you’ll have to manually update the information in Business Central or use the Edit in Excel feature if available.
How to Use the Business Central Edit in Excel and Open in Excel Features
1. In Business Central select the share icon located toward the top of the page.

Depending upon the page that you are on you’ll see Open in Excel and/or Edit in Excel from the drop down.
2. Click which feature you’d like to use.

For the purpose of this article we are going to select Edit in Excel and then we’ll be asked to save our file.
3. Open your file in Excel. Be sure to select enable editing and that you are logged into Business Central.

Excel will automatically recognize this is a file from Business Central and will open up the Microsoft Dynamics side pane.
4. Update the information.

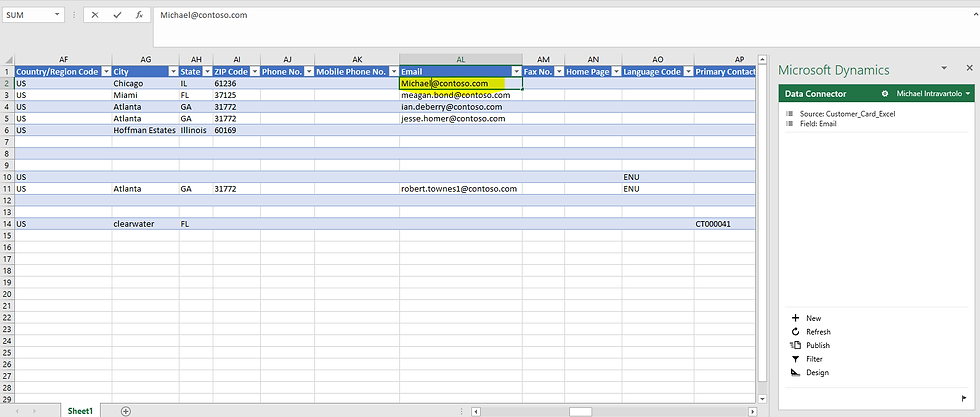
We’ve decided to change the email address on this customer from helen.ray@contoso.com to michael@contoso.com
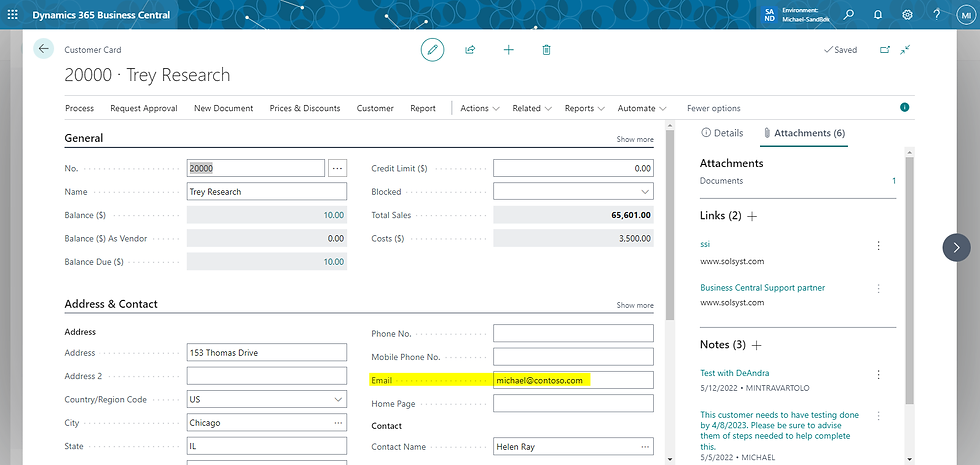
5. Publish your changes back into Business Central.

You do not have to first save your document before publishing your changes into Business Central. Changes usually only take a few moments and when completed you’ll see a Publish Successful message on the bottom of the Dynamics 365 side pane.
Both the Business Central Edit in Excel and Open in Excel features work within any environment on your tenant or within any company in your Business Central.

![[Podcast] A Shot of Business Central and A Beer - Episode 3](https://static.wixstatic.com/media/e6595e_e07269eee7f34c2d813f98e497c08bb5~mv2.png/v1/fill/w_980,h_551,al_c,q_90,usm_0.66_1.00_0.01,enc_avif,quality_auto/e6595e_e07269eee7f34c2d813f98e497c08bb5~mv2.png)


